|
|
|
|
 |
|
|
Page 1
|
|
|
|
|
Updated on November 27, 2006:
I have compiled a few ideas over the years that have saved me time, money and frustration when it comes to taking care of my aircraft. I have gathered these hints and tips together and I would like to share them with my readers. I am maintaining this article for refernce only as some of these suggestions may be dated and the products described may be discontinued...
|
|
|
|
After flight glow fuel engine care - Nov. 06
|
|
|
|
I have adopted a method of keeping my glow fuel engines in tip top shape and this is my procedure: After a day of flight I drain the remaining fuel out of the tank and then run the engine to draw any remaining fuel in the line and burn it. Removing the alcohol based fuel is essential as the fuel draws water out of the atmosphere and will rust steel bearings fast. After the engine is run clean, I apply an after run oil to displace any further water in the engine. Marvel air tool oil is an economical choice for glow engine after run oil.
|
|
|
|
|
|
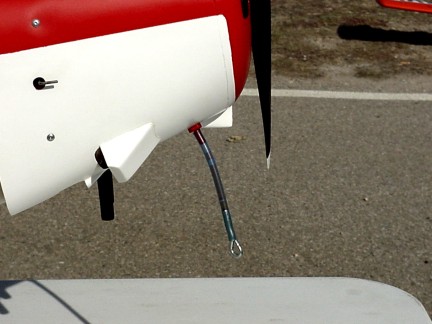
I use a small squeeze bottle with a piece of medium silicone tube attached to apply the oil to the engine. On my four stroke engines, I have fuel tubing attached to my crankcase breather that I use to force a small amount of oil into the bearings. I keep the bottle attached to the tubing and use my electric starter to turn over the engine and blow the excess oil back into the bottle. Once the engine has been oiled, I cap off the breather tube with a plug so I wont loose any oil.
|
|
|
|
I use an electric starter to turn over the engine while the bottle (still attached) collects the excess oil.
|
|
|
|
|
|
On my two stroke engines I do not have a breather tube to oil the bearings so I drop eight drops of oil into the open carburetor and carefully hand flip the oil into the engine. On my helicopter or ducted fan I cannot reach the carburetor opening so I attach the squeeze bottle to the fuel line, squeeze some into the carburetor and use the electric starter to work the oil in. I store my models with the crankcase horizontal or pointed up as the spent fuel residue in the crankcase can create a low-grade acid and rust out the bearings (learned from experience).
I leave the carburetor in the open position so that any remaining alcohol can evaporate out of the engine. Every few weeks I will hand flip my engines to keep the bearings coated with oil thus keeping my engines happy. Be careful when hand flipping engines as they can Diesel and kick over causing injury even without glow ignition.
|
|
|
|
Cleaning your glow fuel aircraft after flight - Nov. 06
|
|
|
|
I had battled with different cleaners for a while before I found that Simple Green degreaser was the most cost effective agent to safely clean glow fuel oil off of my aircraft no matter what they are covered with. I have used Simple Green on fabric, paint, Monokote and plastic canopies with no bad effects. I mix the Simple Green concentrate 1 part to 8 parts water and pour into a spray bottle. This mixture will cut through the oil and will not harm your finish as some ammonia based cleaners can.
|
|
|
|
|
|
The simple green can streak on glossy surfaces so I will use a non-ammonia glass cleaner to clean up streaks on canopies and glossy clear coats. Paper towels are wasteful, costly and not as efficient as using cotton hand towels. I buy bulk cotton hand towels (18-20 for $5.00 ) and wash them when they are used. The cotton towels absorb more and do not have the tendency to scratch glossy surfaces. To wash your washcloths, use the hot water setting and pour in a little bleach/detergent and you will get a lot of uses out of them.
|
|
|
|
Fuel transportation - Nov. 06
|
|
|
|
There are a lot of different fuels required for different engines and can be a drag trying to get a setup that isnt too troublesome. In the beginning of my hobby, I only needed 15% nitro and used an electric fuel pump exclusively to pump the fuel into my trainer. Later on I added four different fuels and smoke oil to my supplies and I had to give up the idea of strapping all of this fuel to my flight box. First I took my electric fuel pump and pitched it as I was not going to have 5 electric pumps with a wire loom connecting some contraption together.
I did not want a complex system of valves or switches to mess with so I built fuel caddies that carry 2 one gallon fuel jugs and put $10.00 hand crank pumps on the side of the caddy. This system was the best for my needs and no batteries required. There are factory made caddies already on the market but you can make your own for less. The best part about using a hand crank pump is that you can count the cranks that it takes to fill your tank or how much you had left after your flight.
|
|
|
|
|
|
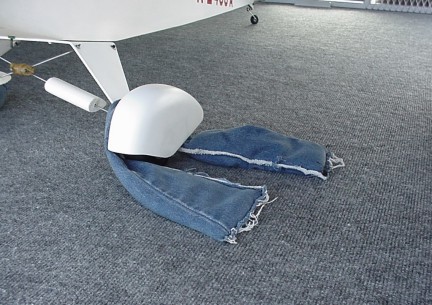
When I load aircraft into my van I use lead shot weight bags to secure the fuselage from rolling around. I make these bags from old pairs of jeans, cutting the legs into sections and sewing lead shot into them. I sew the center section of the bag up to leave a void of shot as to allow me to wrap the bag around a tail wheel or over the fuselage. You can purchase lead shot from a sporting goods or hunting supply.
|
|
|
|
Maintaining nickel cadmium batteries - Nov. 06
|
|
|
|
Taking care of my batteries is serious business as the failure of one cell may cost thousands of dollars in a crash. I take care to test my voltages under load before each flight and follow this guideline for all of my packs: I charge my radio and receiver battery with 1/10 of the batteries milliamp hour (mAh) rating for 14 hours regardless of the batteries charge state. This rate is low enough that it will not damage the pack even if it has a residual charge.
|
|
|
|
|
|
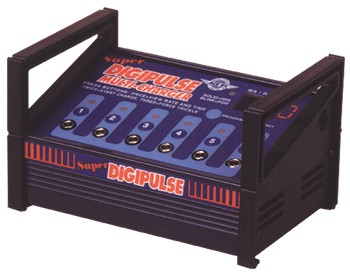
For example; if you have a 1000 mAh pack, you can charge it with 100 mA for 14 hours to get a safe and full charge. Most chargers supplied with your radio use this formula for charging but I prefer to use an ACE R/C Super Digipulse programmable charger because it allows the user to program current and duration of the charge needed. After flying I store the aircraft uncharged but never lower than 1 volt per cell as to prevent a cell reversal which is a change the polarity of a cell in the pack.
|
|
|
|
NiCads have an indefinite shelf life charged or not so I do not worry about charging my packs after flight. NiCads will also discharge themselves while in storage, 10% to 30% during a thirty day period. Once I have 8 to 10 flying days on the pack I use a battery cycler to discharge and charge the pack 2 cycles to test the batteries capacity. The use of the battery cycler helps to prevent battery memory (not fully charging as a result of repetitive partial discharge) and is useful in determining problems with the pack.
For cycling my packs, I use the Cirrus Cycle Pro as this unit has the ability to cycle 1 to 8 cell packs and has two independent charge circuits. After 6 months of battery use, I cycle the pack 3 cycles and log the result on a dated tag inside the aircraft and if the battery does not put out 80% of its mAh rating it is time to replace the cells. As a cardinal rule, I never charge batteries when I am not home and always make sure that I have working smoke detector in the room I am charging in.
|
|
|
|
Reviving dead nickel cadmium batteries - Nov. 06
|
|
|
|
If you find that you left your receiver or transmitter on all night and that your NiCad pack is completely dead, dont immediately charge the battery! Disconnect the pack from the load and let the cells naturally equalize for 6 to 10 hours. This will give the cells time to float back to a positive potential opposed to being completely dead. Once the cells have had time to equalize, charge them at the 1/10 mAh rating or lower for 14 hours. (600 mAh pack = 60 ma charge) IF you attempt to quick charge the dead pack it could suffer a cell reversal and never come back.
Once the pack has reached a full charge, discharge it on a battery cycler to make sure it has retained at least 80% of its mAh rating. If the pack has fallen short of 80%, try cycling it a couple more times to see if you can bring it up. If not, the pack may be permanently damaged.
|
|
|
|
Maintaining lithium polymer batteries - Nov. 06
|
|
|
|
Lithium Polymer batteries are fast becoming the favorite power source for electric powered model aircraft. Li-Po batteries as they are called have a few advantages over conventional Nickel Cadmium and Nickel Metal Hydride cells. Li-Pos have the ability to store incredible amounts of energy inside of a lightweight and small package. They also have a very low self-discharge rate so they will stay charged for weeks! Li-Pos dont require cycling as well because there is no memory affect associated with these cells.
|
|
|
|
|
|
The 3.7 volt cells of a Li-Po battery are used in series, series parallel and parallel configurations to obtain correct voltage and current output. The 3.1 Oz Li-Po batteries seen above are 11.1V cells (3 - Li-Po cells in series) and will yield 1320 mAh. A Ni-Cd or Ni-MH pack offering the same power yield would weigh significantly more than the comparable Li-Po. This weight advantage makes the Li-Po an excellent choice for electric model aircraft. The major disadvantage of Li-Po batteries is that they have temperature and current limitations that if gone unchecked can result in explosion or fire.
Recent accidents with Li-Po batteries have put electric modelers on High Alert making more and more users unsure of the technology. Li-Po cells have caused fires because of improper charging rates, cell freezing, overheating and crash damage. The Li-Po cell must be properly charged and stored as future accidents will jeopardize the hobby use of these cells. Certain safety features have been built into modern chargers allowing for better control of charge current and cell temperature.
|
|
|
|
|
|
The charger that I currently use to care for my Li-Po batteries is the Triton charger by Great Planes. The Triton charger will charge Lithium Polymer, Nickel Metal Hydride, Nickel Cadmium and Lead Acid batteries but I use the Triton primarily for my Li-Po batteries. The Triton charger can safely detect peak voltages while monitoring the pack temperature (with optional probe). These features prompted me to buy the Triton for my packs.
|
|
|
|
|
I built a custom charger board for a couple of Triton chargers which allows me to conveniently take my chargers to the flying field. When I am the field, I use a marine deep cell 12 volt battery to power the chargers and at home I use a Rivergate 30 amp regulated power supply. I modified the stock temperature probes so that they can easily be held against the battery pack with spring tension. By using a couple wheel axles, wheel collars and springs, I fabricated the temperature probe holders. This modification is not necessary but makes for a clean setup! I use adhesive Velcro fasteners to hold the packs in place on the board.
|
|
|
|
Most Lithium Polymer batteries can be charged at a 1/1 current ratio meaning a 1320 mAh battery can be charged with 1.32 amps max. Going over this amount can swell the Li-Po pack resulting in explosion or fire. Care must be taken to properly set the charger and to never leave a pack unattended while charging. Most Li-Pos will operate safely between 35 and 110 Deg. Fahr. so care must be taken to never freeze or overheat these packs otherwise damage may occur. Care must also be taken to check battery temperature after being used as too high of a current draw can overheat cells as well.
Because Li-Pos can generate very high instantaneous currents, extreme care must be taken to never short out a pack. A short can generate extreme heat in a few seconds causing cell swelling and possibly fire or explosion. Burning conductors can also cause a fire so proper conductor sizing is key to safe operation. Li-Pos should never be discharged under load to below 3 volts per cell or permanent damage to the pack may occur. Most speed control systems have integral voltage cutoff systems for Li-Po packs which eliminates the risk of over discharging packs.
Li-Po packs that have lost 20% of their mAh capacity are considered damaged or spent and should be neutralized and disposed of. Proper neutralization of a pack includes discharging the pack to 3 volts per cell, insulating the output conductors from each other and wrapping the cell in a plastic bag. (Proper disposal of Li-Po cells may vary state to state so check with the local authorities having jurisdiction). Li-Po batteries that have been damaged in a crash or improperly charged can have delayed reactions. A crash damaged battery can catch fire long after the pack has been removed from the aircraft.
Batteries that are suspect to damage need to be monitored for at least 15 minutes after the suspected damaging event, preferably outdoors on an incombustible material. Additional battery neutralization may be required for damaged packs that have swollen or ruptured cells. Submerging the pack in a salt water solution for 24 hours has been an acceptable method of neutralizing the potential power and chemical reaction of a Li-Po battery. Although it is NOT recommended that you puncture any Li-Po cell to relieve pressure as a chemical reaction with oxygen may occur resulting in a fire. To reduce the risk of fire associated with battery failure it is also recommended that you never charge a Li-Po pack while it is inside or on a model aircraft.
|
|
|
|
I personally use a product called a Battery Bunker (no longer made) to help protect from a Li-Po battery fire. The Battery Bunker is a stoneware ceramic container that has a locking lid in which you can safely charge, discharge and store your Li-Po packs. The ceramic material used to make the Battery Bunker will hold up to great temperature, reducing the risk of Li-Po caused fires. I store my packs inside a small Battery Bunker when they are not in use which gives me peace of mind while I am away from the packs.
|
|
|
|
|
|
Once again, NEVER, NEVER, NEVER charge Lithium Polymer batteries unattended or you will be putting you home and property at risk. Li-Po batteries are a great asset to the growing electric flight community and we must do our part to follow the safety guide lines to keep their use safe.
|
|
|
|
Balancing lithium polymer batteries - Nov. 06
|
|
|
|
|
|
The most current way to get the most out of your Li-Pos is to use a battery cell balancer. A balancer works by equalizing the voltage in each individual cell. It does this by monitoring the individual cell voltage and then applying a resistance to the high cells to drain them down to the level of the lowest cell. Once the voltage is equal among all of the cells, the equalizer shuts down.
|
|
|
|
|
The main advantage of equalizing your cells is to avoid putting a greater load on unbalanced cells in the pack during discharge. If a low cell discharges before the high cells do, it may go well below 3 volts before the voltage cutoff circuit says the pack is dead. This can permanently damage the pack or seriously limit its life.
I use the Electrifly Equinox Balancer made by Hobbico/Great Planes which is an inline balancer. It can be used with your Li-Po charger to balance your cells while charging or discharging your pack. The Equinox can also be used as a stand-alone balancer to quickly balance your Li-Pos before flight. I do this with all of my packs these days and it seems to make a big difference in battery life.
My most current charger setup uses two Triton chargers on a mobile charging caddy I built. I have added two Equinox balancers to the caddy to balance my cells before each flight. This convenient system holds three Battery Bunkers and features a metal handle as to prevent a fire if a cell flares up in a jar.
|
|